


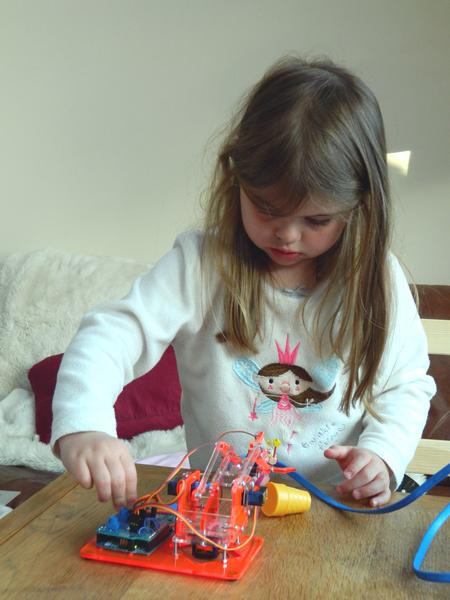
Raspberry Pi, Scratch and Mirobot
One of the things that people asked me during the fantastic Maker Faire UK last weekend was whether Mirobot would work with Scratch and the Raspberry Pi. This is hugely appealing for many reasons, but one that particularly appeals to me is the similarity to the early days of computing in schools. I’ve always said that one of the big influences for Mirobot was the BBC Turtle, which worked with the BBC Micro computer.

Educational robotics, old and new
There’s something really nice about using the modern equivalents to update robotics in schools for the 21st century and using the Raspberry Pi, Mirobot and Scratch makes a poetic kind of sense. Mirobot has been built to be very open so integrations like this are pretty straightforward. Check out the demo video below and then read on for more details on how I did it.
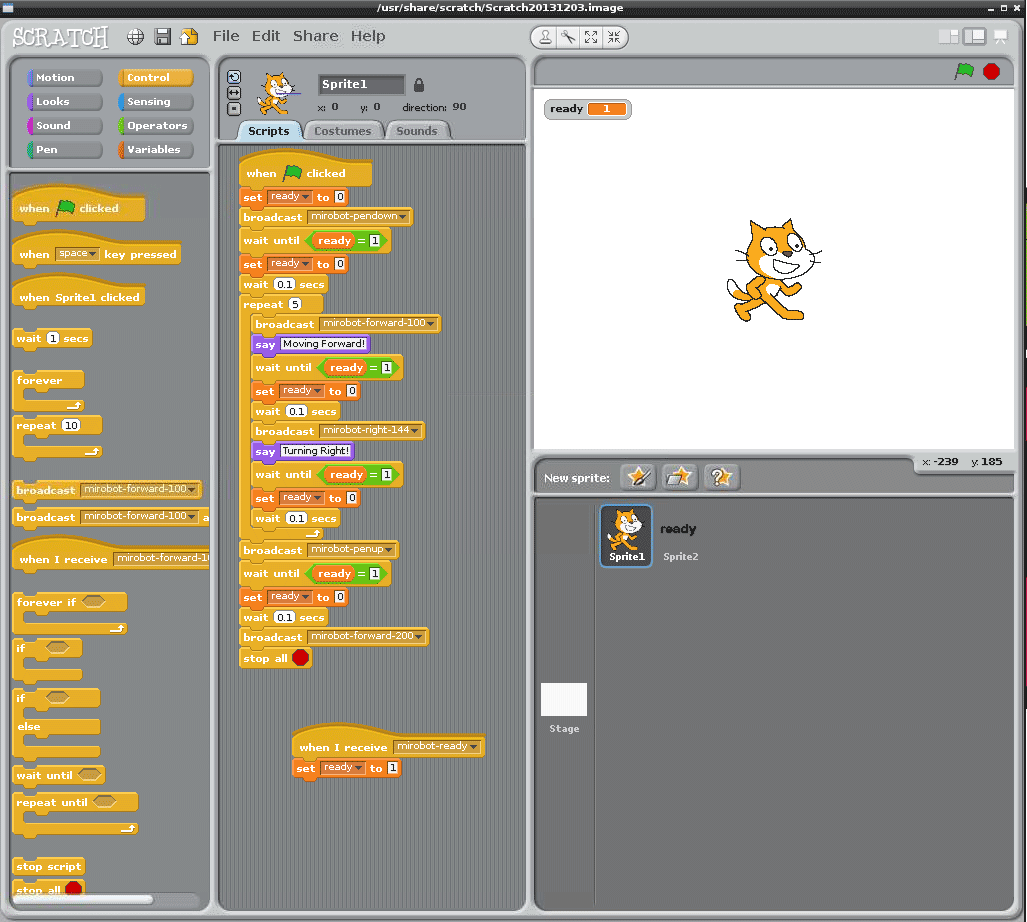
Building integrations like this with Scratch is made relatively tricky because Scratch only has a limited means of interacting with external resources. Fortunately, using the “Remote Sensor Connections” functionality I was able to write a small bridge in Node.js that would send the commands from Scratch to the WebSocket interface of Mirobot and then let Scratch know once the action was complete. You can see the hacked together script in this gist if you’re interested. The way this works is as follows:
- Scratch broadcasts a message, (e.g. mirobot-forward-100) and waits until it has completed
- Node.js receives this message, decodes it (you can’t send arguments) and forwards it on to Mirobot
- Mirobot completes the command and broadcasts the “ready” message
- Scratch receives the “ready” message and continues with the program
I used a trick in Scratch to make it wait until the command had completed before sending the next:

If you’re interested, you can also check out the full Scratch program I ran in the video.
I’d love to make this a bit slicker, but to do that I’d have to create custom blocks which means forking Scratch. It’s sad that Scratch v2.0 won’t run on the Raspberry Pi because the next version can be extended more easily. I think I’ll write an add-on for Snap! which is a well-supported fork of Scratch that supports add-ons like this. It runs in the browser too, so it might make a great default interface for controlling Mirobot in any case.
Read moreWe've just backed the Mirobot! Because it's rather good.
Mirobot is a small, WiFi robotics kit that children can build themselves and then use to learn about technology, engineering and programming. It’s creator Ben Pirt says that fun to build and easy to start programming it to draw shapes. It’s the building aspect of the robot that I like, and the fact that it’s all open - physically in that it has no shell and metaphorically as Ben has already Open Sourced the design. This folks is how to do Open Hardware! You publish! This is one of the reasons I’ve backed the kickstarter, the board is out there being tested as is the chassis. I’m pretty sure I’m going to get something that will work. The files are all on Github:
It looks rather lovely when together too. A lot of work has gone into the aesthetic of the Mirobot, but that really is the tip of the ice berg.
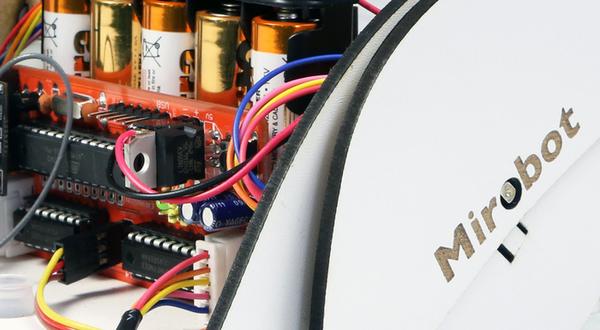
Take a look at the Mirobot.io website and you’ll see a huge amount of work has gone into this project, and it’s all been shared. There are a number of little innovations which really impress me, like the optimisation of the PCB for soldering by beginners.
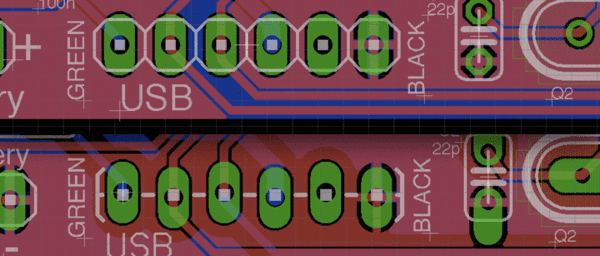
This shows staggered pins on this header, which means the header won’t flop about as you try to solder it. It’s a simple but time consuming tweak that will make all the difference to someone soldering their first project.
There’s also a whole software aspect of the project that I’ve glossed over a bit as I assume I can code, I can’t so this will be great when I actually run the Mirobot with my kids.
As the title said we’ve backed the Mirobot and that’s the “Royal we” as phenoptix is just me at the moment. If you back it under my recommendation I’m pretty sure you’ll be pleased with what you receive, but let it still be your choice! The kickstarter can be found here
Read moreArmy of Me (Arm)
Wow, it’s been over a week since my last blog post and probably a day or two before that. I’ve fallen off the blog wagon hard and need to get right back on.
Why did I fall off? Well I blame the boy, had about three weeks where my fantastic son George decided to wake up every few hours, combine this with my fantastic wife going back to work as a midwife left me sleep deprived and only really able to perform the basic functions of this daily pursuit I’ve come to call work. Orders packed, emails replied, much coffee drunk.
That’s not quite true though, another pursuit managed to fill the cracks and become an obsession. The MeArm. The MeArm is a low cost robot arm, build for my frustration with the uArm Kickstarter for an Open Source robot arm. Why the frustration? Well it was $185 for a product already available for $115. Touted everywhere as Open Source and yet a month on from successful funding to the tune of $251,887 and there’s still no files. Not to say they won’t come, but for me until it’s open it’s closed.
Never one to allow the energy of frustration to go to waste I set about building the MeArm v0.1 (files on thingiverse). In construction I borrowed a lot from the plot clock, actually starting with their files and stretching out the arms. There was no gripper but I was quite pleased with the results.
Not really a finished article and lacking in gripper - the best bit about a robot arm right? It did at least inspire Jack Howard to get involved in the project. Jack is a mechanical engineer with a lot of experience in CAD. He come to phenoptix fairly often on our mostly unpublicised Open Office Fridays. Jack has turned up with designs for the laser cutter before and I’ve always been impressed by the fact that they work first time. I do everything in 2D and mesh them together in my mind and by rotating the work on the page, relying on my access to the laser to tweak down to a finished product.
Very quickly Jack built was was to be considered the v0.2 (files on thingiverse). It was heavy weight and had a gripper, unfortunately too heavy for our choice of servos, but it was so solid compared to my v0.1. I could still add improvements so considered running my own development alongside Jacks. Setting aside a couple of days of hacking time where I could learn CAD to improve my design I ultimately ended up frustrated by my slow progress. I managed to add a centre piece for stability but it took me so long. I made a short video of the v0.2 and where improvements could be made for starters.
Sorry it’s recorded hand held on my phone.
Really where the project gained momentum and started to take shape was after the feedback I received at the Linux User Magazine Pi Jam in Poole. Tim from PiBorg asked if me learning CAD was worth my time, when I was working with someone who was clearly expert in it. I’m too used to doing things myself, learning a new skill when its needed then moving onto the next problem that needs solving. Silly that it took this comment but it opened my eyes and I felt able to feedback what I felt was needed for the next iteration to Jack, who was able to add his own genius to come up with the v0.3 (files on thingiverse).
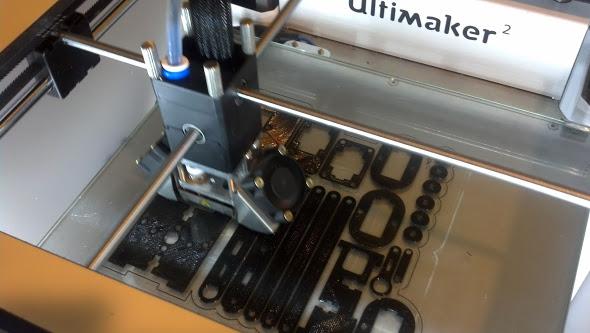
The v0.3 is the first kitable version and ticks all of the boxes I set out to tick. It can sell for a retail of around the £25 mark (available here) and could be made by a savvy school or maker for around £8. You can cut it from a sheet of A4 sized acrylic and build from common fixings (everywhere but the USA with their stupid Imperial measurements!). Hopefully it will stand up to 3D printing too. Kevin Osborn of Wyolum is currently printing off a first draft.
If he can track down some metric (M3) fixings it should work, it would be interesting to see how imperial screws fit though.
Last night I took it home to work on some code, but ended up just playing - I did at least make a video!
There was a little more product testing this morning too. This time from my wonderful daughter, who was quite impressed with it and wasn’t able to break it! She load tested it more thoroughly than I did discovering it will lift spinning ballerinas and plastic ice cream cones but will not stretch to Mummy’s keys.
So there you have it, why I’ll been so quiet this last few weeks. Also new product - £25 robot arm! Let me know what you think!
Read moreAn Update
I’ve not blogged here for a little while, primarily because I’ve had my head down preparing to launch Mirobot on Kickstarter. However, I’ve still made some good progress in a few areas that I thought it would be worth updating on.
I’ve been experimenting with different chassis materials and have found some nice melamine faced MDF that I think looks good. The black edges contrast really well. It required a bit of cleaning but I’m hoping that I can tweak the laser cutting process to reduce this. It’s fine for small volumes, but if the Kickstarter is successful then I’ll need to make sure this process is efficient.

I also tried using acrylic but I don’t think it looks as nice:

I’m using a new WiFi module (this one) which is smaller and easier to mount as it uses a pin header instead of surface mount. It needs an external antenna, but I’d come to the conclusion that I was going to need one anyway because the signal was very weak. The reception is still not massively strong, but then for a module that’s only drawing about 50mA that’s to be expected.
The Javascript web application used to control it is now embedded in the memory on the WiFi module. It’s possible to replace the configuration pages on the module (in case you want to translate them or something) but I don’t think they’d considered how useful it is having an embedded webserver on your socket <-> serial converter. I’ve written a WebSocket handler so now you load the web application up and then it communicates in real time over the WebSocket to send commands to the Arduino. This is working really well and makes it quite easy to talk to Mirobot from other scripts (I’m looking forward to hooking it up to Cylon.js). I’ve coded it so that the socket can be used in either raw socket mode or WebSocket mode depending on which you prefer.
Now I’ve built a version that looks good it’s time to put that all important video together. I’m going to be at Maker Faire UK at the end of April. Hopefully the Kickstarter will be launched by then. If you’re going, then stop by and say hi.
Read more